Hi. This is my first post here so, smile and wave.
I sorta got into YOYOing to pass time whenever I got bored, as I love toys that can endlessly entertain, without batteries. I am very much a beginner.
But, when my CAD teacher said I could 3D print anything for senior years end, I quickly settled upon making a customized yoyo. I don’t know much of anything about YOYO engineering but it can’t be that bad. All I know is heavy weight towards the outside of it will improve spin time, and that bearings are the way to go.
I am just starting my research so if you could point me in the right direction…
Right now I want a modular YOYO, that has a bearing Axle.
I want the Axle to go through the whole yoyo, so that I can add Grab disks, which are on some high end YOYO.
For 3D printing don’t try to print the “best” yo-yo, just pick a simple design that you like and have fun with it. The only real advice I have is to design around metal spacers like PGM Spacers (http://shop.yoyoexpert.com/product/124/YYF-Spacers) from the start, trying to 3d print a bearing seat will only cause problems.
it’s more difficult than it seems. Lots of other people who do know about yoyo design have been trying for a long time to make a good 3D printed yoyo. There have been some successes but it’s not easy.
The main issue is accuracy. A body that spins at thousands of RPMs needs to be very precise and 3D printing is just not there yet.
And as Garrett referenced, figuring out how to do the “guts” is a challenge. You can use existing metal spacers as suggested. That’s probably the best way to go. Doing guts out of plastic doesn’t work well at all.
I guess it depends on your goal here. If you want to make something like a yoyo that spins that’s not too hard. But if you want it to perform half way decent, then you’re in for quite a nice challenge.
Obviously in order for the yoyo not to wobble and rattle like a dubstep drop, the seat that you slide the inner race of the bearing onto needs to be a very snug fit. A lot of companies seem to go overly-snug in order to keep the yoyo smooth, ending up with a bearing that can be very difficult to remove. The tolerances for bearing seats are incredibly precise, and it seems that only one(drop) company have it fully dialled.
The issue with plastic, especially 3D printed, is not only that getting that kind of accuracy is very difficult, but the plastic of the bearing seat will be weaker than the metal of the bearing that you’re forcing onto it, so you risk damaging/warping it.
In the plastic Rally above you’ll notice that Onedrop machined the bearing seat and response area out of metal and then attached it to the plastic body, solving this issue.
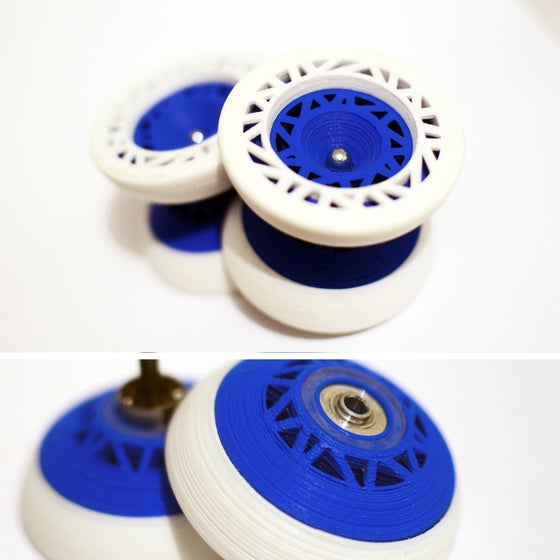
Likewise, as you can see in these 3D Printed yoyos:
They also use metal bearing seats. That being said, even with a metal bearing seat my Arcadius (the blue and white one) wobbles like a jelly on a washing machine, so it seems that the innacuracy of 3D printing inevitably makes for a less than smooth experience.
Theres a member on these forums with the username “Kyo”, he’s done some pretty epic things with 3D printed yoyos, so it might be worth PM-ing him and seeing if you can get some advice.
At any rate, I wish you all the best with your project.
Have you discovered a material that can be used with a 3D printer extruder that weighs as much as steel or titanium (presuming you’re using your standard fuse deposition modelling-type printer)? If not then copying a design won’t do anything for you and will play terribly.
I actually just printed one of the Microsoft YoYo’s.
The size is terrible, and the material that the Makerbot uses is lightweight. I beleive our other school printer is better. Part of the problem is the Makerbot printed in a hollow hex pattern. This effects alot. The Axle is not correct either, so it can’t keep to together. Frankly Makerbot seems to be garbage. We got a printer which was a lemon from them. Then the school got a replacement which has constant filament jams and errors. That is likely why the axle failed. I have learned that printer grain alone can return the yoyo to hand. It does work. Just not well. Therefore I am hopeful.
I have enough spare parts to make the YoYo. I got the parts from a Yomega Yomods Green kit, which comes with a bearing
The biggest problem is weight and shape. As NathanC brought up, this YoYo will not be a metal yoyo. It is plastic.
Ther I am making my YoYo bigger than my normal Throws, with a solid butterfly shape. This will help. I just bought two large washers, which wheigh more than my current YoYo’s. I can integrate these into my YoYo for added weight. Question is, can a YoYo wheigh to much?
Most throws now a days run about 65grams.
The thing with the washers is that they will have to be perfectly centered or it will be off balance. I like the idea though. Keep working at it.
The fill pattern is what all printers do… you can control how much fill is there (and its shape), and you can make it close to solid if you choose. The tradeoff is the more fill you have, the heavier it will be, but the longer the print will take… and I mean -way- longer… the effect is exponential. It’s the difference between an hour long print and a 10 hour print. The same goes for layer height… halve the height double the time but increase the surface finish.
Every printer has errors and jamming problems… you have to tweak them a LOT to get consistent high quality prints. You’ll have to do some research on this… it’s not that the printer is bad, it’s that they aren’t as simple as everybody wants to think they are.
My current thow is 82 grams. My 2 washers are 87 grams before assembly. hm. I kinda like heavy. But I could get smaller washers. I don’t know. I don’t have access to CAD until I’m back in school.
The Makerbot just seems to be having extra issues. Our first one, the lemon, had severe axis drift. All the prints looked like modern art. The fill thing makes sense, but our schools better printer doesn’t seem to do that At all.
I got back into class and rebuilt the body from the ground up using tips from a private source. The body shape is now complete, including space for a cutout of a washer. This will be press fitted into the body, with one on either side. They will allow my YoYo to be well about 150 grams. A little heavy, but it will be a good start, overcoming any flaws it has with sheer force.
Now, for the hard part. The Axle and response. I have 3 options…
I can make a Starburst response. I don’t like this though.
I can use an existing Metal Bearing Seat. This is possibly the best option, but I need a good seat, so… can someone recommend one? I have one… but the bearing wobbles in it. Is this normal? Anyways, the seat is going to be press fitted into place.
Or I Can 3D print my Seat. I know it’s not recommended. But it will fit better. Our 3D printed can print with extreme accuracy. I feel this is worth a shot… maybe. Our printer is a 10000 dollar system. So… it will be fine.
On responses, I can add either a O ring, or a sticker.
The last idea is possibly to make my YoYo fully compatible with the Yomega Yomods system. This would be cool but… it’s veering away from the idea of a scratch built YoYo.
Another idea I may add to V1 is a O Ring groove in the outer rim. This will allow the YoYo to take impacts. I may add a few. If anyone has a better way to add a rubber rim, speak up please.
The Final update. Hubstacks are still something I want. Could someone please send a close up of theirs? I think its just a bearing on the main axle, with a sheath. Then its held on with a nut. If anyone knows otherwise…
I have included progress photos. Excuse the quality I had to snap them minutes before the bell.